Kitchen Knife Sharpening Guide: Every Method Compared
Compare whetstones, electric sharpeners, guided systems, and more. Our complete kitchen knife sharpening guide covers cost, edge quality, and best uses.
Editorial Review
Independent, research-driven reviews by our editorial team
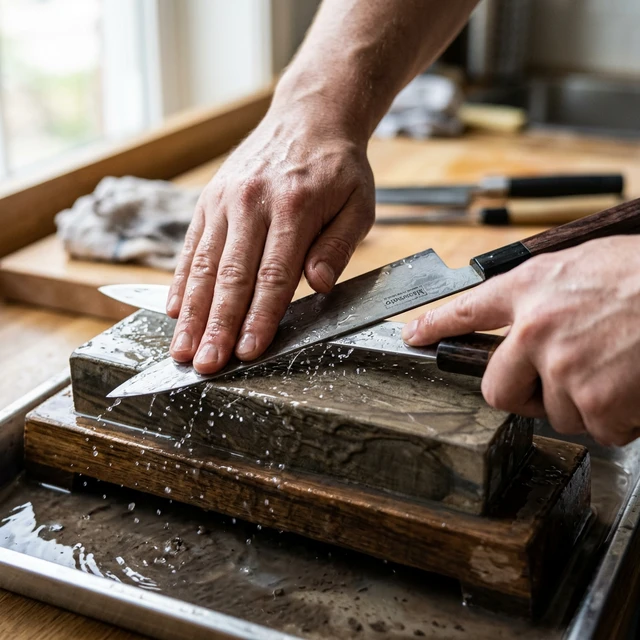
Table of Contents
Affiliate Disclosure: We may earn a commission if you purchase through our links. This doesn't affect our reviews.
Affiliate Disclosure: Kitchenware Authority is an Amazon Associate. We earn from qualifying purchases at no extra cost to you. This helps support our independent research and chef-reviewed guides.
A $200 chef's knife with a dull edge cuts worse than a $30 knife that's properly sharpened. I've watched professional cooks butcher proteins with cheap Victorinox blades that glide through tendons — and I've watched home cooks struggle to dice an onion with a Wüsthof Classic that hasn't been touched in two years.
The difference is never the knife. It's the edge.
But here's where most people get stuck: there are at least six different ways to sharpen a kitchen knife, and each one produces a different result, costs a different amount, and works better for certain knives than others. Pull-through sharpeners, whetstones, guided systems, electric sharpeners, honing rods, and professional services all have a place — but choosing the wrong method can actually damage your blade.
This kitchen knife sharpening guide breaks down every method head-to-head so you can pick the right one for your knives, your budget, and your patience level.
Honing vs. Sharpening: The Distinction That Saves Your Knives
Before we compare sharpening methods, you need to understand this: honing is not sharpening.
When you use a knife, the thin cutting edge rolls and bends microscopically. The blade isn't dull — the edge is just misaligned. A honing rod straightens that edge back into position without removing any steel. It takes 15 seconds and should happen before every cooking session.
Sharpening removes metal to grind a completely new edge. It's necessary when honing no longer restores cutting performance — typically every 2-4 months for a home cook who cooks 4-5 times per week.
If you're only honing, your knife will eventually need sharpening anyway. If you're only sharpening and never honing, you're removing far more steel than necessary and shortening your knife's life. The two work together.
For a reliable honing rod, the Idahone 12-inch ceramic rod ($30-$35) is the standard recommendation among professional sharpeners. Ceramic rods are harder than steel rods, which means they work on both Western and Japanese blades without risk.
Idahone 12-Inch Fine Ceramic Honing Rod
If you prefer a slightly larger option with a more ergonomic handle, the Messermeister 10-inch ceramic rod runs about $30 and has a comfortable oval grip that provides better control during the honing stroke.
Messermeister 10-Inch Ceramic Rod
Understanding Sharpening Angles: 15° vs. 20°
Every knife blade is ground to a specific angle. Getting this wrong during sharpening will either weaken the edge or make the knife cut poorly.
20° per side (40° inclusive): Standard for most Western-style knives — Wüsthof, Henckels, Mercer, Victorinox. The wider angle creates a more durable edge that resists chipping. This is the angle you want for general home cooking with European-style knives.
15° per side (30° inclusive): Standard for Japanese knives — Shun, Global, Miyabi, MAC. The acute angle creates a sharper, thinner edge that excels at precision cuts. The trade-off is that it's more prone to chipping if you twist the blade or hit bone.
How to find your knife's angle: Check the manufacturer's website. If you can't find it, here's a general rule — if the blade steel is harder than 60 HRC (most Japanese knives), sharpen at 15°. If it's softer (most German knives), sharpen at 20°. Not sure about your blade? Our guide on essential kitchen knives covers what to look for in different styles.
Method 1: Whetstones (Water Stones)
How it works: You soak the stone in water for 5-10 minutes, then draw the blade across the stone at a consistent angle, alternating sides until a burr forms and is removed. Different grit levels handle different stages — coarse grits (200-400) repair chips, medium grits (800-1000) sharpen, and fine grits (3000-8000) polish.
Cost: $25-$80 for a quality combination stone. A King 1000/6000 combination stone — the most universally recommended beginner stone — runs about $25-$30.
Learning curve: Steep. Maintaining a consistent angle by hand requires practice. Expect 3-5 sessions before you're producing reliably sharp edges. Most beginners struggle with angle consistency and applying even pressure.
Edge quality: The best of any method. A properly used whetstone produces a refined, polished edge that outperforms every other sharpening tool. At 6000 grit, you'll get an edge that glides through tomato skin without any downward pressure.
Safe for: All knives — Western, Japanese, carbon steel, stainless steel, single-bevel, double-bevel. This is the only method that works safely on every type of kitchen knife.
When to use it: When you want the absolute best edge and you're willing to invest 15-20 minutes and the practice time to develop the skill. Whetstones are the gold standard for Japanese knives especially, since many other methods can chip their harder steel.
King 1000/6000 Combination Whetstone
For a deeper walkthrough on stone selection, grit progression, and technique, check our guide on the best knife sharpening stones for beginners. We also have a dedicated tutorial on how to sharpen a Japanese knife if you're working with harder steels.
Method 2: Guided Sharpening Systems
How it works: A clamp holds the knife in place while you draw an abrasive stone along the blade at a mechanically fixed angle. The guide eliminates the biggest challenge of freehand sharpening — angle consistency. Systems like the Work Sharp Precision Adjust let you dial in exact angles from 15° to 30°.
Cost: $50-$200 depending on the system. The Work Sharp Precision Adjust runs about $50-$60 and includes diamond and ceramic abrasive plates.
Learning curve: Low to moderate. The guide handles angle control, but you still need to learn proper stroke technique and pressure. Most people produce a solid edge on their first or second attempt.
Edge quality: Very good. Not quite the refinement of a skilled whetstone user, but significantly better than electric or pull-through sharpeners. The fixed angle means every stroke is consistent, which produces a clean, even bevel.
Safe for: Most knives. Works well with both Western and Japanese knives since you can adjust the angle. Not ideal for single-bevel Japanese knives (yanagiba, deba) or extremely curved blades.
When to use it: When you want near-whetstone results without the freehand learning curve. This is my recommendation for most home cooks — it hits the sweet spot between edge quality and ease of use.
Work Sharp Precision Adjust Knife Sharpener
Method 3: Electric Sharpeners
How it works: Motorized abrasive wheels or belts spin against the blade while spring-loaded guides hold the knife at a preset angle. Most quality units have multiple stages — coarse grinding, fine sharpening, and stropping or polishing. You draw the knife through slots at a slow, steady pace.
Cost: $30-$180. Budget models under $40 are almost universally destructive. Quality units like the Chef'sChoice Trizor XV run about $130-$160 but justify the cost with precision engineering.
Learning curve: Very low. Pull the knife through the slots slowly and evenly. The machine handles angle and abrasive pressure. A sharp edge in 60-90 seconds.
Edge quality: Good. The Trizor XV specifically produces a three-bevel "trizor" edge that's impressively sharp — sharper than what most beginners achieve on a whetstone. However, the edge doesn't have the same refined polish as a high-grit stone finish.
Safe for: Western knives and some Japanese knives. The Trizor XV sharpens at 15° per side, which actually works for most Japanese knives. However, the abrasive wheels remove more steel per session than a whetstone, so over years of use, you'll lose blade material faster. Never use an electric sharpener on single-bevel knives, ceramic knives, or serrated blades (unless the unit has a dedicated serrated slot).
When to use it: When speed and convenience are the priority and you're working with standard Western chef's knives. Ideal for busy home cooks who want a sharp knife in under two minutes without learning technique.
Chef'sChoice Trizor XV EdgeSelect
For a more detailed breakdown of electric vs. manual options, see our best knife sharpener guide.
Method 4: Pull-Through (Manual) Sharpeners
How it works: Two carbide or ceramic v-shaped elements sit at a fixed angle inside a housing. You pull the knife through the slot, and the abrasives grind against both sides of the blade simultaneously. Some models have two stages (coarse and fine).
Cost: $8-$30. They're the cheapest sharpening option available.
Learning curve: None. Pull the knife through. That's it.
Edge quality: Poor to mediocre. Pull-through sharpeners remove steel aggressively and inconsistently. The fixed v-shaped abrasives can't follow the blade's natural curve, creating an uneven edge. The resulting edge is functional — it'll cut a tomato — but it won't hold for long, and repeated use thins out the blade significantly.
Safe for: Inexpensive Western knives only. Never use a pull-through on Japanese knives (the hard steel will chip), high-end German knives (it removes too much material), or any knife you care about preserving long-term.
When to use it: When you need a quick edge on a cheap knife and don't care about long-term blade health. A $12 pull-through at the back of a restaurant line for beating up a beater knife? Fine. Your Shun Premier? Absolutely not.
Method 5: Honing Rods (Steel and Ceramic)
How it works: You draw the knife blade along the rod at a consistent angle (matching your knife's edge angle), alternating sides with light pressure. The rod doesn't sharpen — it realigns the edge. Steel rods are softer and gentler; ceramic rods are harder and provide a very light abrasive action that micro-polishes the edge.
Cost: $15-$40 for a quality rod. The Idahone ceramic rod is about $30-$35 and will last a decade.
Learning curve: Low to moderate. The motion takes a few tries to learn, but it's far simpler than whetstone technique. Watch the angle, use light pressure, and alternate sides evenly — 5-6 strokes per side is sufficient.
Edge quality: N/A for sharpening (it's maintenance, not sharpening). But a ceramic rod does lightly refine the edge, making it feel sharper than a steel honing rod alone.
Safe for: Steel rods work on Western knives. Ceramic rods work on both Western and Japanese knives. Never use a grooved steel rod on Japanese knives — the grooves can chip the harder steel.
When to use it: Before every cooking session. This is the single most impactful thing you can do to keep your knives cutting well between sharpenings.
Method 6: Professional Sharpening Services
How it works: You drop off your knives (or mail them in), and a professional sharpens them on a belt grinder, stone, or combination of both. Turnaround is typically 1-7 days depending on local availability.
Cost: $5-$10 per knife for a basic edge. $15-$25 per knife for premium sharpening with specific angle requests and polished finishes. Mail-in services charge $8-$15 per knife plus shipping.
Learning curve: Zero. You hand over the knife and get it back sharp.
Edge quality: Varies dramatically. A skilled professional with proper equipment produces an edge comparable to or better than a whetstone. A guy at the farmers market with a bench grinder will overheat your blade and ruin the temper. Ask what equipment they use and what angle they sharpen at. If they can't answer, walk away.
Safe for: All knives, assuming the professional knows what they're doing. Specify that you have Japanese knives if applicable — they require different angles and technique.
When to use it: When you have no interest in learning to sharpen, own expensive knives you don't want to risk, or need chips and damage repaired (which requires coarse grinding that's risky to do at home without experience).
The Comparison Table
| Method | Cost | Learning Curve | Edge Quality | Steel Removal | Best For |
|---|---|---|---|---|---|
| Whetstone | $25-$80 | High | Excellent | Low (controlled) | All knives, especially Japanese |
| Guided System | $50-$200 | Low-Medium | Very Good | Low-Medium | Home cooks wanting quality edges |
| Electric Sharpener | $30-$180 | Very Low | Good | Medium-High | Western knives, speed priority |
| Pull-Through | $8-$30 | None | Poor | High | Cheap knives only |
| Honing Rod | $15-$40 | Low | N/A (maintenance) | None-Minimal | Daily maintenance, all knives |
| Professional | $5-$25/knife | None | Varies | Varies | Expensive knives, damage repair |
How to Test If Your Knife Is Sharp
Don't test sharpness by running your thumb along the edge — that's how you end up in the emergency room. Use these methods instead:
The paper test: Hold a single sheet of printer paper by one corner. Draw the knife downward through the paper, starting at the heel. A sharp knife cuts cleanly with no tearing. A dull knife catches, crumples, or slides off the paper entirely.
The tomato test: Place a ripe tomato on a cutting board. Rest the knife's edge on the skin without applying downward pressure. Draw the knife backward gently. A sharp edge bites into the skin immediately. A dull edge slides across it.
The fingernail test: Rest the edge lightly on your thumbnail at about a 45° angle. A sharp knife "sticks" and grabs the nail. A dull knife slides off. This takes practice to do safely — don't press hard.
The onion test: Try to make a fine brunoise (1/8-inch dice) on half an onion. A sharp knife produces clean, uniform cuts with no crushing. If the onion cells are rupturing and you're crying more than usual, the knife is dull.
My Recommendation for Most Home Cooks
If you own chef's knives under $200 — which covers the vast majority of home cooks — here's the setup I recommend:
- A ceramic honing rod for daily maintenance ($30-$35)
- A guided sharpening system like the Work Sharp Precision Adjust for bi-monthly touch-ups ($50-$60)
- A King 1000/6000 whetstone for when you want to learn proper freehand technique ($25-$30)
Total investment: about $110-$125. That covers every sharpening need for the life of your knives.
If you own Japanese knives, a whetstone is non-negotiable. Guided systems work, but freehand stones give you the control needed to maintain asymmetric grinds and acute angles without risking chips. Start with our guide on how to sharpen Japanese knives for the specific technique.
If you just want sharp knives with zero effort, the Chef'sChoice Trizor XV is the best electric option on the market. It's $130-$160, but you'll have a razor-sharp edge in 90 seconds every time you use it. Just know that it removes more steel per session than manual methods, so your knives won't last as many decades.
Sharpening Frequency by Knife Use
| Usage Level | Honing | Full Sharpening |
|---|---|---|
| Light (1-2 meals/week) | Weekly | Every 6-12 months |
| Moderate (4-5 meals/week) | Before each session | Every 2-4 months |
| Heavy (daily, professional) | Before each session | Every 4-6 weeks |
| Butchery / Hard ingredients | Before and during use | Monthly |
These are guidelines, not rules. The paper test is your real indicator. When honing stops restoring the edge, it's time to sharpen.
Common Sharpening Mistakes to Avoid
Using too much pressure: Let the abrasive do the work. Heavy pressure on a whetstone creates an uneven bevel and can dish out the stone prematurely. On electric sharpeners, pressure causes the motor to grind too aggressively.
Inconsistent angle: The number one reason home sharpeners produce poor edges. If your angle wanders by even 3-5° during a stroke, you're creating a rounded, convex bevel instead of a flat, clean one. Guided systems solve this mechanically.
Skipping grits: Going from 400 grit straight to 6000 grit doesn't save time — it wastes it. The fine stone can't remove the deep scratches left by the coarse stone. Follow the progression: 400 → 1000 → 3000 → 6000. For maintenance sharpening where the edge isn't damaged, starting at 1000 grit is fine.
Not forming a burr: The burr — a tiny flap of metal that forms on the opposite side of the edge you're grinding — is your proof that you've sharpened all the way to the apex. If you don't feel a burr before switching sides, you haven't sharpened enough. Run your fingertip perpendicular across the edge (not along it) to feel for it.
Sharpening serrated knives on flat stones: Serrated edges require a tapered rod that fits into each serration individually. A flat stone or electric sharpener will grind the serrations flat and destroy the blade.
The Bottom Line
The "best" sharpening method depends on what you own, what you're willing to spend, and how much time you want to invest. But the actual worst method is not sharpening at all. A dull knife is more dangerous than a sharp one — it requires more force, slips more often, and crushes rather than cuts.
Pick any method from this guide, learn it properly, and your knives will outperform blades that cost three times as much. Start with a ceramic honing rod and a 1000/6000 whetstone if you're unsure. The total investment is under $60, and those two tools will handle every knife in your kitchen for the next decade.

Nora Whitfield
Writer, Kitchenware Authority
Nora Whitfield writes Kitchenware Authority's reviews and buying guides. Every knife, pan, and appliance is vetted against maker specifications, materials and safety documentation, and the long-run experience verified home cooks report — not first-hand lab tests.
Upgrade Your Kitchen Skills
Get chef-curated gear reviews, maintenance tips, and exclusive buying guides delivered to your inbox.
Join 15,000+ home cooks. No spam, ever.